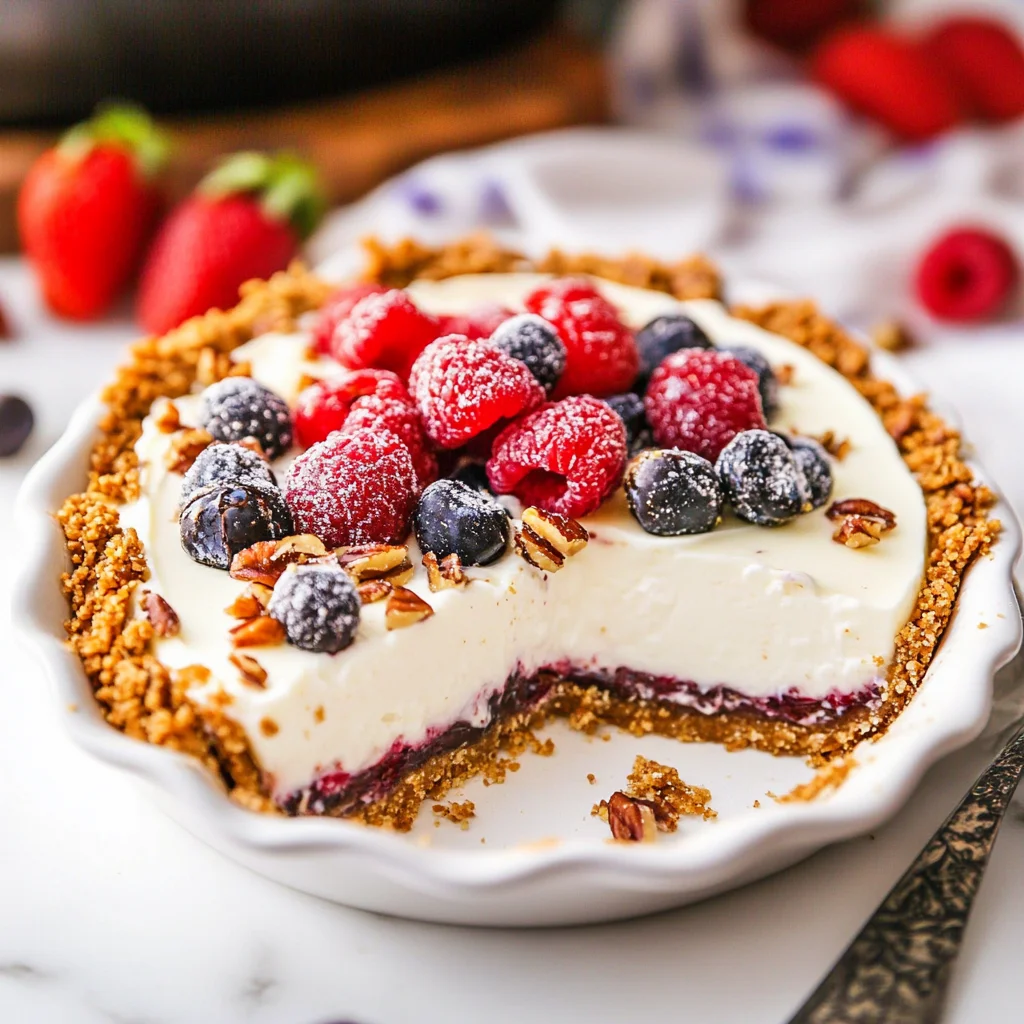
Creamy and refreshing, Yogurt Pie with Date-Nut Crust is the perfect dessert for any occasion. This no-bake delight combines a smooth vanilla bean filling with a naturally sweetened and nutty crust. Perfect for summer gatherings, picnics, or simply a light treat at home, this pie stands out with its wholesome ingredients and delightful flavor. Whether you’re serving it for a special occasion or enjoying it after dinner, this yogurt pie will impress everyone!
Jump to:
- Why You’ll Love This Recipe
- Tools and Preparation
- Essential Tools and Equipment
- Importance of Each Tool
- Ingredients
- For the Crust
- For the Filling
- For Garnish
- How to Make Yogurt Pie with Date-Nut Crust
- Step 1: Prepare the Dates
- Step 2: Prepare the Pie Plate
- Step 3: Make the Crust Mixture
- Step 4: Form the Crust
- Step 5: Make the Filling
- Step 6: Add Berries on Top
- Step 7: Chill Before Serving
- How to Serve Yogurt Pie with Date-Nut Crust
- Pair with Fresh Berries
- Drizzle with Honey
- Serve with Whipped Cream
- Accompany with Mint Leaves
- Presentation on a Decorative Plate
- How to Perfect Yogurt Pie with Date-Nut Crust
- Best Side Dishes for Yogurt Pie with Date-Nut Crust
- Common Mistakes to Avoid
- Refrigerator Storage
- Freezing Yogurt Pie with Date-Nut Crust
- Reheating Yogurt Pie with Date-Nut Crust
- Frequently Asked Questions
- Can I customize the Yogurt Pie with Date-Nut Crust?
- How do I make this Yogurt Pie with Date-Nut Crust dairy-free?
- What types of fruit work well on top of this pie?
- How long does it take to prepare the Yogurt Pie with Date-Nut Crust?
- Final Thoughts
- 📖 Recipe Card
Why You’ll Love This Recipe
- No-Bake Delight: Enjoy a delicious dessert without the hassle of baking. Just mix, chill, and serve!
- Healthy Ingredients: Made with Greek yogurt and naturally sweet dates, this pie offers a guilt-free indulgence.
- Versatile Topping Options: Customize your yogurt pie with a variety of fresh berries or your favorite fruits.
- Perfect for Any Occasion: Whether it’s a summer BBQ or a holiday gathering, this yogurt pie fits right in.
- Easy to Prepare: With simple steps and minimal prep time, this recipe is great for both beginner and experienced cooks.
Tools and Preparation
Before you start making your Yogurt Pie with Date-Nut Crust, gather the essential tools you will need. Having everything ready will make the process smooth and enjoyable.
Essential Tools and Equipment
- Food processor
- 8-inch pie plate
- Mixing bowls
- Measuring cups and spoons
- Plastic wrap
Importance of Each Tool
- Food processor: This tool quickly blends the crust ingredients into a perfect crumbly mixture.
- Pie plate: An 8-inch size is ideal for shaping your yogurt pie while providing ample serving space.
- Mixing bowls: Useful for combining the yogurt filling smoothly without any lumps.
Ingredients
Creamy no-bake Greek Yogurt Pie with a vanilla bean filling and naturally sweetened date-nut crust. Light, refreshing, and topped with berries—perfect for summer!
For the Crust
- 15 medjool dates (with the pits)
- ¾ cup walnuts
- ¾ cup unsalted roasted almonds
- ¼ teaspoon kosher salt
For the Filling
- 1 ¼ cups whole milk Greek yogurt
- 1 teaspoon vanilla bean paste or vanilla extract
- ½ teaspoon orange zest
- 2 teaspoons honey
For Garnish
- 1 ½ cups mixed berries (sliced strawberries, raspberries, blackberries, blueberries)
- Nonstick cooking spray
How to Make Yogurt Pie with Date-Nut Crust
Step 1: Prepare the Dates
Add the dates to a bowl and cover them with very hot water. Cover the bowl and let them sit for 15 minutes. Drain the dates, pat them dry, cut them in half, and remove the pits.
Step 2: Prepare the Pie Plate
Spray an 8-inch pie plate with nonstick cooking spray and set it aside.
Step 3: Make the Crust Mixture
Add the soaked dates, walnuts, almonds, and kosher salt to the food processor. Pulse until finely chopped. The mixture should hold together when pressed between your fingers.
Step 4: Form the Crust
Transfer the mixture to the prepared pie plate. Lightly spray your hands or use a measuring cup bottom sprayed with nonstick spray to press down on the crust evenly across the base and sides.
Step 5: Make the Filling
In a medium bowl, mix together Greek yogurt, vanilla bean paste (or extract), orange zest, and honey. Spoon this mixture into your prepared crust and smooth it into an even layer.
Step 6: Add Berries on Top
Arrange your mixed berries on top of the yogurt filling in your desired pattern. Loosely cover it with plastic wrap.
Step 7: Chill Before Serving
Refrigerate your pie for at least one hour before serving. Once chilled, slice into wedges using a small offset spatula to remove each slice cleanly. Enjoy!
How to Serve Yogurt Pie with Date-Nut Crust
Serving your Yogurt Pie with Date-Nut Crust can elevate its appeal and enhance the dining experience. Whether you’re hosting a gathering or enjoying a quiet evening, these serving suggestions will make your dessert shine.
Pair with Fresh Berries
- Top each slice of pie with additional mixed berries for a pop of color and flavor.
- Use seasonal fruits like strawberries, blueberries, or raspberries for freshness.
Drizzle with Honey
- Add a light drizzle of honey over the top before serving.
- This enhances the sweetness and complements the yogurt’s tanginess.
Serve with Whipped Cream
- A dollop of whipped cream can add creaminess to each slice.
- Consider using flavored whipped cream, such as vanilla or orange zest.
Accompany with Mint Leaves
- Garnish each slice with fresh mint leaves for a refreshing touch.
- This also adds an appealing visual contrast against the pie’s colors.
Presentation on a Decorative Plate
- Serve the pie on a beautiful cake stand or decorative plate.
- A visually appealing presentation makes it more inviting to enjoy.
How to Perfect Yogurt Pie with Date-Nut Crust
To ensure your Yogurt Pie with Date-Nut Crust turns out perfectly, follow these helpful tips. These suggestions will help you achieve the best texture and flavor in your dessert.
- Choose ripe dates: Use soft, ripe Medjool dates for better sweetness and easier blending in the crust.
- Measure accurately: Be precise while measuring yogurt and other ingredients to maintain consistency in flavor and texture.
- Chill properly: Refrigerate the pie for at least one hour before serving to help it set and enhance its flavors.
- Experiment with toppings: Feel free to explore various toppings like coconut flakes or citrus zest for added flavor dimensions.
- Store leftovers wisely: Keep any leftover pie covered in the fridge; it stays fresh for up to three days.

Best Side Dishes for Yogurt Pie with Date-Nut Crust
Enjoying your Yogurt Pie with Date-Nut Crust alongside complementary side dishes can round out your meal beautifully. Here are some great options that pair well.
Fruit Salad
A colorful fruit salad provides freshness and balances the richness of the pie. Toss seasonal fruits together for variety.Greek Salad
A light Greek salad made with cucumbers, tomatoes, olives, and feta offers a savory contrast to the sweet pie.Cucumber Raita
This cooling yogurt-based dish adds creaminess and is perfect if you want something refreshing on the side.Honey Roasted Nuts
Serve crunchy honey-roasted nuts for a sweet yet crunchy accompaniment that complements the pie’s flavors.Granola Parfait
Layer granola, yogurt, and berries in small cups for an engaging presentation that echoes elements of the main dish.Herbed Quinoa Salad
A herbed quinoa salad brings a nutty flavor profile that balances well with the sweetness of the pie.
Common Mistakes to Avoid
Making a Yogurt Pie with Date-Nut Crust can be simple, but there are common pitfalls to watch out for. Here are some mistakes to avoid:
Skipping the soaking step: Failing to soak the dates can lead to a crust that is too hard. Always cover the dates with very hot water for 15 minutes to soften them.
Not pressing the crust firmly: If you don’t press the crust mixture firmly enough into the pie plate, it may crumble when sliced. Use a flat measuring cup or your hands to ensure it’s packed tightly.
Ignoring refrigeration time: Serving the pie immediately after preparation can result in a less-than-ideal texture. Remember to refrigerate your pie for at least an hour before serving for the best results.
Overloading on fruit: Adding too many berries can make the pie soggy. Stick to about 1 ½ cups of mixed berries for balanced flavor and texture.
Using non-Greek yogurt: Regular yogurt won’t provide the same creamy consistency. Always opt for whole milk Greek yogurt as specified in the recipe.
Refrigerator Storage
- Store your Yogurt Pie with Date-Nut Crust in an airtight container.
- It will stay fresh in the refrigerator for up to 3 days.
Freezing Yogurt Pie with Date-Nut Crust
- Wrap individual slices tightly in plastic wrap and place them in a freezer-safe container.
- You can freeze it for up to 2 months. Thaw overnight in the refrigerator before serving.
Reheating Yogurt Pie with Date-Nut Crust
- Oven: Preheat your oven to 350°F (175°C). Wrap slices in aluminum foil and heat for about 10-15 minutes.
- Microwave: Place a slice on a microwave-safe plate and heat for 20-30 seconds, checking frequently.
- Stovetop: Use a non-stick skillet over low heat. Heat each slice covered until warmed through, about 5 minutes.
Frequently Asked Questions
Can I customize the Yogurt Pie with Date-Nut Crust?
Yes! You can customize this pie by using different nuts or adding spices like cinnamon or nutmeg to enhance flavor.
How do I make this Yogurt Pie with Date-Nut Crust dairy-free?
To make it dairy-free, substitute Greek yogurt with coconut yogurt and ensure that all other ingredients are also dairy-free.
What types of fruit work well on top of this pie?
You can use any mixed berries such as strawberries, blueberries, raspberries, or even sliced peaches or kiwi for a colorful topping.
How long does it take to prepare the Yogurt Pie with Date-Nut Crust?
The total time is approximately 85 minutes, including chilling time. The active prep time is only about 25 minutes!
Final Thoughts
This Yogurt Pie with Date-Nut Crust is not only light and refreshing but also incredibly versatile. With its creamy filling and naturally sweet crust, it’s perfect for summer gatherings or any occasion. Feel free to customize it with your favorite fruits or nuts, making it your own unique dessert! Give this recipe a try—you’ll love how easy and delicious it is!
Did You Enjoy Making This Recipe? Please rate this recipe with ⭐⭐⭐⭐⭐ or leave a comment.
📖 Recipe Card
Print
Yogurt Pie with Date-Nut Crust
- Total Time: 0 hours
- Yield: Serves approximately 8 slices 1x
Description
Indulge in a slice of heaven with our Yogurt Pie with Date-Nut Crust, a creamy and refreshing no-bake dessert that’s perfect for any occasion. This delightful pie features a smooth vanilla bean filling made from Greek yogurt, perfectly balanced by a rich, nutty crust crafted from Medjool dates, walnuts, and almonds. Ideal for summer gatherings, this light treat impresses with its wholesome ingredients and vibrant toppings of fresh berries. Whether you’re hosting a festive BBQ or simply enjoying a quiet evening at home, this yogurt pie is sure to be a crowd-pleaser. Easy to prepare with minimal effort, it invites everyone to savor its deliciousness guilt-free!
Ingredients
- 15 Medjool dates (pitted)
- ¾ cup walnuts
- ¾ cup unsalted roasted almonds
- 1 ¼ cups whole milk Greek yogurt
- 1 teaspoon vanilla bean paste or extract
- ½ teaspoon orange zest
- 2 teaspoons honey
- 1 ½ cups mixed berries (for garnish)
- Nonstick cooking spray
Instructions
- Soak pitted dates in hot water for 15 minutes; then drain and dry.
- Prepare an 8-inch pie plate with nonstick spray.
- In a food processor, blend soaked dates, walnuts, almonds, and salt until crumbly; press into the pie plate.
- Mix Greek yogurt, vanilla paste, orange zest, and honey in a bowl; pour into the crust.
- Top with mixed berries and refrigerate for at least one hour before serving.
- Prep Time: 25 minutes
- Cook Time: None
- Category: Dessert
- Method: No-Bake
- Cuisine: American
Nutrition
- Serving Size: 1 serving
- Calories: 250
- Sugar: 18g
- Sodium: 45mg
- Fat: 12g
- Saturated Fat: 1g
- Unsaturated Fat: 11g
- Trans Fat: 0g
- Carbohydrates: 30g
- Fiber: 4g
- Protein: 6g
- Cholesterol: 10mg